
I'm in a dilemma.
It's time for a new project I would like to report about.
But it is gonna be a surprise. So I have to keep it somehow secret.
I think I can show single elements of it and we will bring it all together when time comes.
At one of my last visits at the DIY market I have made a surprising find. They had got some nice boards of Alder in stock. That's new - Rough lumber at the DIY market. And the even more weird thing was, that all the boards had the same price. Doesn't matter which dimensions. Hmm, I was searching through the stack until I have found the longest and widest board. The boards have been pre-thicknessed to about 22 mm (7/8" for my imperial friends ;-)). The one I've chosen is about 22 cm wide at the widest point (without the live edge) and 3,50 meters long.
At that time I did not know what to do with it. But it was looking good, I wanted to make some more experiences with hardwood and I have more then enough projects on my bucket list.
Anyway, what do we know about Alder? It's a hardwood. European Alder has closed pores, and a fine, even grain. It
is very easy to work with both hand and machine tools. And although it
is a hardwood it is rather soft. All in all that sounds excellent for
hand tool woodworking.
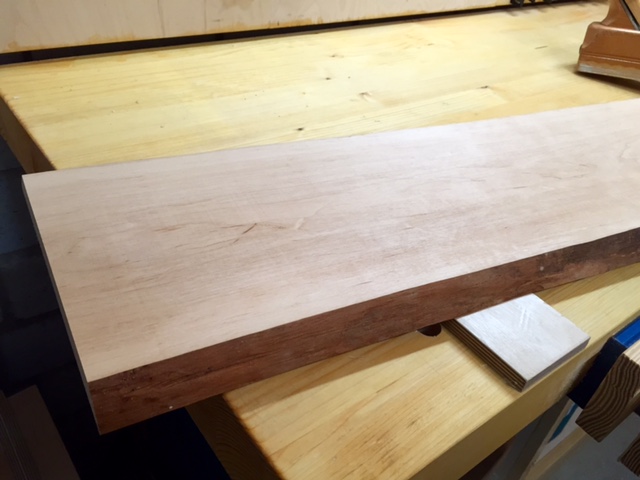 |
| Alder board with live edge |
Now I know what to do with. But I will keep it as a secret for a while. Therefore the project is called "The Secret Project" for the time being.
Here we go...
Wood Prepping
As each project will, also this one started with wood preparation.
I've roughly laid out the needed board lengths and started with cross cutting the single pieces to length.
Oh, that went pretty well. Not to saw as easy as Pine or Spruce, but far away from the hardness of Ash or Beech.
 |
| Boards with live edge |
Here are the first five pieces. As you can see they still have their live edges. I've thought about what will be the best ways of side trimming. Ripping the board along the full length or working in portions. I decided for the latter. My second decision was to try something new too. Instead of ripping I chopped the sides with a hatchet.
 |
| Chopping away the live edge |
With the fingers out of the way that went surprisingly well. I think this is due to the fine and straight grain.
For sure that isn't exactly to size. But it was quick, with less effort and a good enough edge to plane the rest of it with a jack plane.
I've cut away the live edge on both sides. Then I cut the boards to final width and will use the offcuts for some details of this project. Actually the boards had got a good size to handle them securely to work with the hatchet. I guess I wouldn't use it for the narrow offcuts.
So, all edges done. The rest is just establishing a reference face and edge and ripping the boards to final width.
Planing Alder
To make it short. To plane this Alder board is a real joy. After you have done the first shavings the wood is shining like a mirror. And it is really nice to plane either with wooden or metal planes.
 |
| Planing with a metal jack |
 |
| Shavings from a wooden jack |
I found it very easy to flatten the boards. Never before it was so easy to find the hiccups and to remove them so selective. Quite sure this is because of the wood characteristic.
We will see how tricky it will be to handle when it comes to joinery.
Thicknessing
Last step of this preparation process was to bring the boards to final thickness. I was shooting for about 16 mm. So I scribed a line all around the perimeter and have established a bevel from the backside face to this marking line. So I know if the bevel is gone while planing that I'm nearly down to final thickness.
The first four pieces are done now. Four sides square. Next I will square one end and cut them to final length.
 |
| Left: board in final thickness - Right: bevel as depth mark |
The first four pieces are done now. Four sides square. Next I will square one end and cut them to final length.
 |
| Stack of 4S boards |
What's Next
There is some more preparation work to be done. The offcuts have to been resawn. I will need some narrower stock which will be about 10 mm thick.
I have one board with its live edge on reserve. I want to keep and integrate the live edge into the project.
Not sure how to prepare the edge. Scraping? Sanding? Any hints?
Stay tuned!
Stefan
Stefan,
ReplyDeleteNo hints but the board prep looks very good.
I haven't seen anything but Knotty Alder at my local woodstore, needless to say working it with hand tools would be "different".
ken
Hi Ken,
Deletemostly you will get Black Alder if you will buy it at a local woodstore in Germany. From what I have read there are other types of Alder trees which are not grown big enough so you won't get knot free material. And for sure that isn't to handle properly. I believe in most cases that will end as firewood.
But the stuff I've at hand is behaving nicely.
Cheers,
Stefan
When my sister had her kitchen remodeled, I took a bunch of wood that had been used on the former cabinets. I thought it was maple, but it turned out to be something else. I've never been certain, but I think it is alder. It has been a nice wood to work with. And I think it's an attractive wood, too. Good luck on the new project.
ReplyDeleteOf course without seeing it, it is hard to say but red birch was the "in" wood of the seventies. Looks similar. Bob L.
DeleteHi guys,
Deletefrom what I have read i know that Alder is easy to stain.
So that makes it ideal for faking some rare or tropical wood. That's the reason why it was used for furniture builds like for example kitchens.
And Alder belongs to the family of Birches (Betulaceae). That might be the reason why the wood is looking similar.
Cheers,
Stefan
Its OK Stefan you can tell us, it will stay between us and the Internet, your secret will be safe :-)
ReplyDeleteNot sure what your question about the edge is all about? Do you mean to preserve the live edge??
Bob and Rudy, scratching our butts
Hi Bob,
Delete:-) Yeah I know, weird idea to chose the Internet to keep a secret. But that's the actual project and I won't bore you to death with more tools.
Regarding the live edge. I would like to preserve as much of the structure and shape of the edge. But I have to remove the stuff you will find under the bark (do not exactly know how it is called). I think that can be scraped. Just wanted to know if there is a better method so that I will not remove all the irregularities.
Cheers,
Stefan
Sounds like this is a "this is for you honey.....".
ReplyDelete